


Halloween has come & went but I wanted to share my costume. I went as a mermaid and created the costume myself. It was quite labour intensive as I'm definitely an amateur sewer, but it actually turned out #success
I wasn't really able to document how I went about sewing the skirt and creating the top, but wanted to share a few steps along with photos of the finished product as I know some you ladies were asking.

3 comments

Last weekend a few girlfriends and I threw a surprise engagement party for our friends. From the get go, we knew we wanted it to be nautical with a blue, white and gold colour scheme. It was something we planned for almost two months and we got a really awesome reaction from the bride and groom-to-be!
I wanted to share a few of the things we did, the decor and how it all came together, plus a few DIY's if you'd like to see.
Click for more photos....

I know I'm a little late, but we had a Halloween party last night, despite being the day after, and I wanted to share our costumes.
Marco came up with the idea to be mimes and I was able to mostly pull things from our closets to complete our outfits. I picked up his striped shirt at Joe Fresh and bought white cream make-up for our faces.

Click to see how I pulled these costumes together...

Happy Halloween! Despite being confused with a ballerina 50% of the time, this pink flamingo costume was a big hit and cute at the same time. I hadn't planned to dress up during the day today but then I saw Veronika's adorable flamingo DIY for her daughter and it sparked an idea for myself.
Click to see more photos & how I made it...

Since Fall has come in with a bang, now is the perfect time to show you how to distress your denim shorts.
Not.
I took these photos a couple months ago but sat on editing them forever. Well, here we are, almost halfway into September and I'm finally getting this up. That said, you can still rock your denim shorts with some tights (are we still feeling that look?) or have them ready-set-go for your upcoming tropical vacation.
Read on to find out how I did mine...


Mine: Colbretti men's jeans from Value Village ($6)


And of course a shot of me wearing them:


This is the maternity maxi dress I made for my sister for her baby shower. Clearly it has been cinched and clamped at the back in the photo above as I don't have a maternity mannequin, but you can see how it looked on her in the photo below.
We went to the fabric store several months ago to pick out some thick jersey. She choose this pretty blue colour--and ironically she's having a boy--and I took it home. I didn't start the dress until the Monday before the Saturday shower. Halfway through the evening, I texted her in a bit of a panic as I realized making a maxi with no pattern--just a maxi she already has as a guide--and none of her measurements wasn't really going to work. She came over half an hour later and proceeded to put it on and take it off several times as I made adjustments here and there. Good thing she did because the top part (I sewed the top and skirt seperate and then attached them) was looking a little Star Trek-ish until I ruched up the shoulers.
After she left, I sewed the skirt, attached it to the top and did the hem. The dress turned out beautifully despite being a little longer in the torso than expected (my sister ended up belting the dress to solve that problem, which really worked out) and I was so proud. I dropped the dress off the morning of the shower and saw her a couple laters in it when she arrived. It is my best piece to date as despite creating a maxi dress for myself a few months ago, this was different as it was (a) a maternity style, and (b) had 'straps'. I'm hoping she will still be able to wear it after the baby is born.

Me & my sis playing the, 'Guess how big the baby belly is with a ribbon-game'.
I took pictures of my sister at the shower, outside, by herself but sadly--and I'm pretty upset over this--the pictures were somehow erased off my SD card. I'm trying to recover them but think it may be a lost cause. If I'm able to recover them I will definitely add them to this post at a later date and let you know.

I went on the hunt last week on my lunch hour for an oversized graphic tee for this DIY. I'd seen a few variations around the web and wanted to make something different than I'd made before. After seeing a cool Jamaica-logo-emblazed top at Winners for $17, I knew I could find something cheaper--and better?--at the thrift store.
After searching for a good 15 minutes in the men's section, I came up emtpy handed and discouraged. I was about to leave when I forced myself to take one more look through the women's section and that's when I spotted this beauty. It turned out to be exactly what I was looking for, and the fit is slightly oversized but still skims the body and for $1.99, it was right on budget.

I started by cutting off the sleeves and then the neckline. The braid up the back is fancy and slightly more challenging so check out this DIY video to see how I did that, sort of.

Weekend Recap coming up!

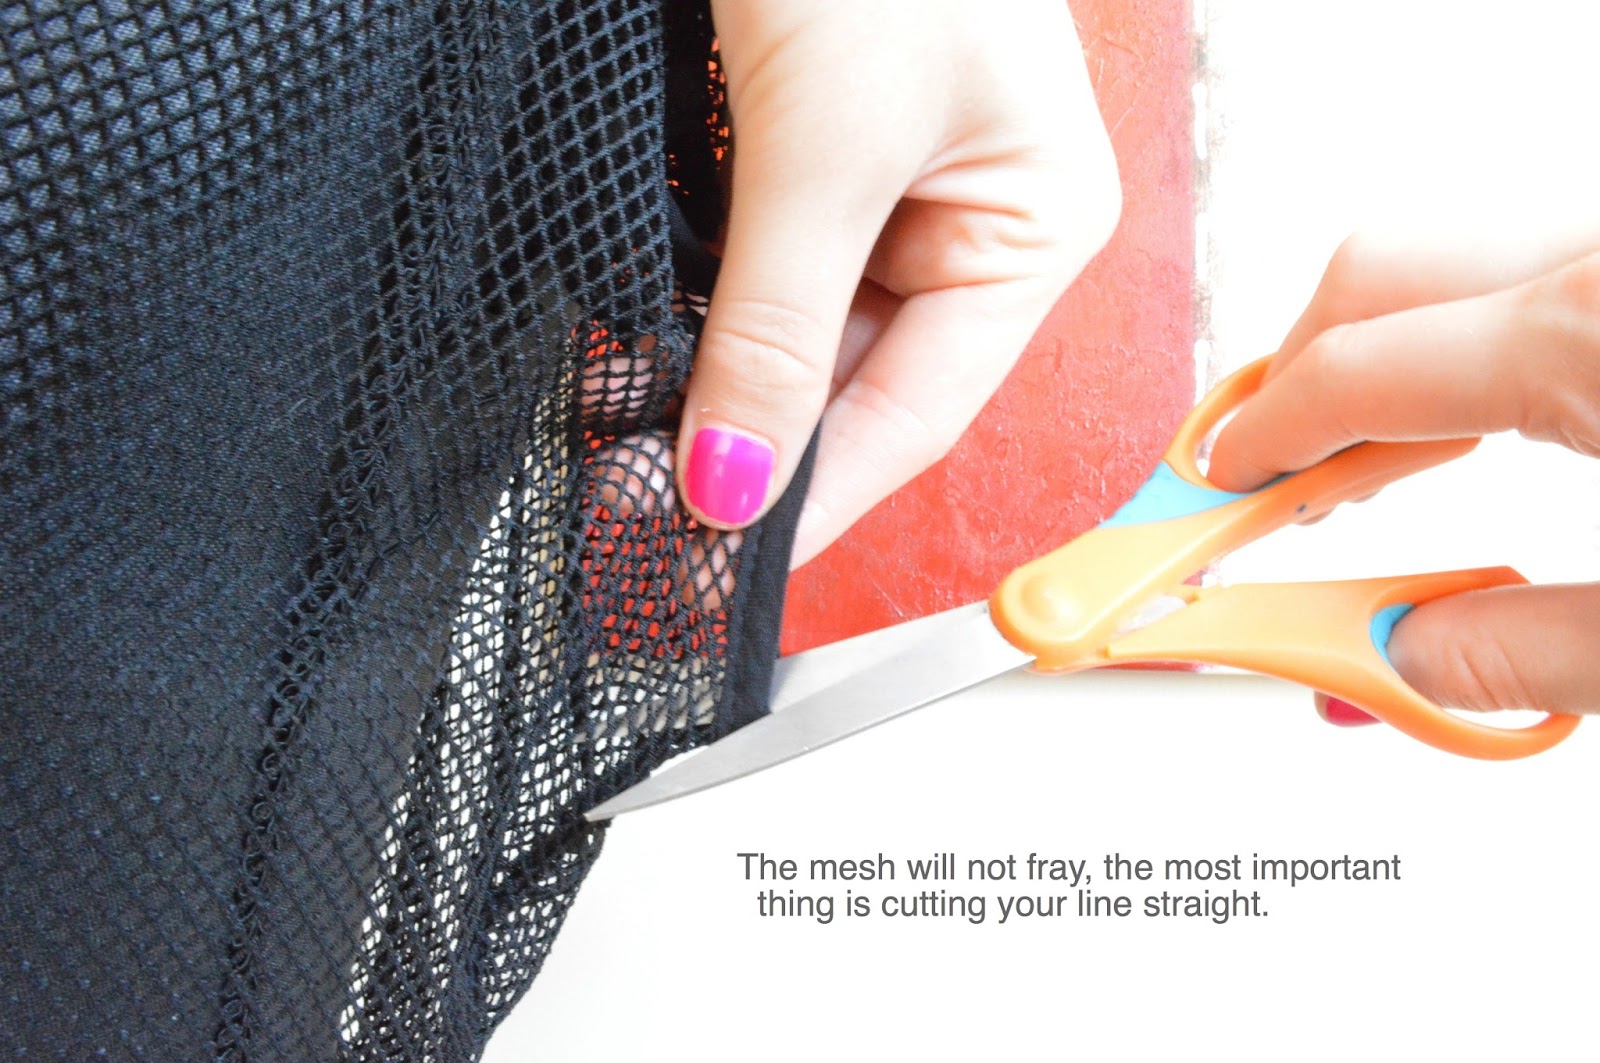
Mesh is an up and coming trend so when I spied this super on-sale Vero Moda top I scooped it up from The Bay with this DIY in mind. Speaking of sales, Place d'Orleans is having a huge side-walk sale next week, July 11 - 14 and I can guarantee I'll be hitting that up to score some great deals (you should to!).
Back to the skirt, I love the idea of pairing this mesh overlay on top of a black skirt to add some interest to an outfit. You might remember this peplum top from my Fall Fashion vlog--peplum is still going strong so if you haven't jumped on the band wagon yet, the time is now--and these wedges from my Spring Trends vlog. I've also thrown in a few newbies that are currently in store like this Limité pink statment necklace & the white studded Ardène cross-body clutch down below.
Scroll down to check out this easy, no-sew DIY.


Try it with neon... or other fun items found at Place d'Orleans:

If you try this, be sure to tweet me with the hashtag #PDOmeshoverlayskirt
HAVE FUN!
* This post is sponsored by Place d'Orleans, the mall I vlog for. As always, thanks for reading & for supporting my sponsors! Be sure to check out the Place d'Orleans Facebook page for more information & promotions happening within the mall.
For my eleventh video as the Place d'Orleans Fashion Vlogger, I'm sharing my DIY kiss-printed jacket. Inspired by Erin Fetherston's Spring 2013 collection & LoveMaegan's take on it, I decided to give it a whirl and I love the results!
A fresh look for Spring that I can't wait to rock. The best part? It's no sew and anyone can do it. Peep the vid to get in on the kissing action.
Stay tuned for more videos (specifically on the Place d'Orleans FB page).
Other videos:
* Fall Fashion (video #1)
* Wardrobe Classics (video #2)
* Bundling Up for Winter (video #3)
* How-to Style a Sequin Skirt (video #4)
* What to Wear for New Years Eve (video #5)
* New Year, New You! (video #6)
* Accessories & a Hair Tutorial (video #7)
* Fall Fashion (video #1)
* Wardrobe Classics (video #2)
* Bundling Up for Winter (video #3)
* How-to Style a Sequin Skirt (video #4)
* What to Wear for New Years Eve (video #5)
* New Year, New You! (video #6)
* Accessories & a Hair Tutorial (video #7)
* What to Wear on a Date (video #8)
* Dreaming of Summer (video #9)
* How-To Turn Your Maxi Dress into a Maxi Skirt (video #10)
More videos on my YouTube Channel.

For my tenth video as the Place d'Orleans Fashion Vlogger, I'm showing you exactly how to turn your maxi dress into a maxi skirt (via video!). I absolutely loved the chevron pattern on this maxi dress from Urban Planet but sadly, as you can see, it's more than a tad short. I couldn't pass it up though (it was $19; cheaper than buying the fabric itself!) and knew instantly what I wanted to do--I never even tried it on as a dress in the store, I simply tried it as if it were a skirt!
Watch the video below to see a very easy way to use your sewing machine to turn your maxi dress into a maxi skirt.
SIDE NOTE: I added a waist-band to the skirt as it wasn't long enough for me without it (I'm 5'11), however, if you're shorter, or your fabric is longer, you could skip the waist-band part altogether. Since this is jersey fabric, if you're not a sewer, or don't have a machine, you can simply cut it and wear it. The jersey will not fray, simply roll a little, which looks charming anyways.
Stay tuned for more videos (specifically on the Place d'Orleans FB page).
Have fun!
Other videos:
* Fall Fashion (video #1)
* Wardrobe Classics (video #2)
* Bundling Up for Winter (video #3)
* How-to Style a Sequin Skirt (video #4)
* What to Wear for New Years Eve (video #5)
* New Year, New You! (video #6)
* Accessories & a Hair Tutorial (video #7)
* Fall Fashion (video #1)
* Wardrobe Classics (video #2)
* Bundling Up for Winter (video #3)
* How-to Style a Sequin Skirt (video #4)
* What to Wear for New Years Eve (video #5)
* New Year, New You! (video #6)
* Accessories & a Hair Tutorial (video #7)
* What to Wear on a Date (video #8)
* Dreaming of Summer (video #9)
See another maxi dress I turned into a skirt HERE (no waist-band and a simple stitch waist).
More videos on my YouTube Channel.

I found this beautiful sheer and opaque striped maxi dress on the weekend (at Sirens) and like all maxis, it was too short for me. I couldn't pass up the eye-catching fabric though and decided to purchase it for $19 and re-fashion it into a maxi skirt.
It turned out beautifully and I can't wait to wear this on vacation and come summer!


More steps after the jump if you're interested in how I did this...

Have an old sweatshirt that needs sprucing up before tossing out? Or perhaps, like me, you're looking for the perfect casual-meets-cool sweatshirt.
I found this sweatshirt at Giant Tiger for $4 (what?!); they also had black and navy (which I may go back for another at that price). The great thing about the price too is if you screw it up, it's not a huge deal. Read on to see how I made this masterpiece...


Fold the sweater in half so your neckline is equal.

Start cutting about 2 - 3 inches in from the shoulder seam.
I wanted to keep the 'triangle' stitching at the neck so
I just cut above that along the collar seam at the front.
(My boat neck actually ended up being a little too wide, but oh well, I will still wear it).

Voila!*
Pair it with:
* Jeans & a pair of ankle boots.
* A sequined skirt & tights.
* Leggings and a long tank (sporty, even works for the gym).
Don't feel like making one? Here are some cute F21 options:
* Tie-dye.
* Similar to mine (gray).
* Yes, I basically cut the neck line out of this sweatshirt and rolled up the sleeves. It doesn't get much simpler than that. You could cut off the bottom band, but I wanted to keep mine... for now at least. Have fun!

On the weekend I spent my Sunday reorganizing my apartment. I moved things from room to room, switched my bedroom around and unpacked items that were 'waiting' to be used. One of these items was a beautiful frame I was given after my sister's wedding (to put a picture of us in, likely in my office) that was still sitting in it's box (the larger frame at the back). Since we haven't gotten the digital prints from her wedding yet, I don't have a picture to use, but in the mean time, I decided to spruce up my night-table with some scarf framed art.
This project will take you no time at all, and if you have a piece of fabric you love, or a scarf and some frames that aren't being used, you're in business.
Simply fold up your silk scarf/fabric to fit the frame, seal shut and enjoy. Easy as pie!


This is not so much a tutorial as it is a suggestion: dotted nails!
I have been loving this style, so much so that I did two manicures back-to-back with this. While I didn't take any photos of the steps, it's very simple:
1. Paint nails your colour of choice.
2. Let a brush-full of white nail polish drip onto a piece of tin foil.
3. Take a toothpick and dip in the white nail polish.
4. Dot six small dots up your nail (you might have to re-dip your toothpick half way through).
5. Seal with a clear coat.


L.A. Express Earrings ($8)
I bought these earrings at Sirens on Friday night. I hated the white beads on them but seeing past that, I knew I could modify them. I love the idea of spike earrings, don't own any, and the price was right on these. I took them home, removed all the spikes and beads, and re-strung the spikes back on the hoops. Et voila! Much nicer.

Sydney from The Daybook | My creation
Inspired by Sydney's look above (and realizing I couldn't order that exact skirt; too short for me), I pondered if I could make my own maxi skirt. Not a stranger to sewing (I've made a top, a dress, and a few other things), but certainly not a pro, I headed to my local fabric store in search of some pink jersey.
Jersey is an 'expensive' fabric, for what you're getting at least (c'mon, it's like t-shirt material), but it's my favourite fabric to work with as technically, you don't have to finish the edges as it will simply roll and never fray, it holds it's shape and (almost) never snags as you sew.
I found some pink jersey for $20/meter and asked one of the women working there to help me measure against myself. My specifics were simple: long enough for me and my 4-ish-inch heels with a folder over band. She cut me about 1.5 meters and it was the perfect amount.
I didn't document my steps extremely well, but follow the captions and it's actually quite simple. This took about two hours and I banged it out in one evening.

* Hold the fabric up length-wise at the store to ensure what you're cutting is long enough. For reference, I'm 5'11 and we did 1.5 meters.
* I laid out a maxi dress I own and traced the skirt portion, generously leaving an extra 5 inches or so on one side. I also started my tracing about 6 inches down from the top of my fabric (to account for the fold over waistband). I initially pinned it in a waved look, hoping it would cling to my butt better and flare out (like a fit 'n flare style) but learned that you can simply pin straight down.

* After sewing the fabric together to create a seam down the back of the skirt, I would try it on, discover it was too big, re-pin, sew, try on, etc. Keep doing this until you are satisfied with the fit.
* Then I sewed a 1 inch hem around the bottom.

* In the left shot you can see the additional fabric at the seam on the back (I'm wearing the skirt inside out). Once you are satisfied with the fit, you can cut this off.
* The right shot is a shot of the skirt head on, sewn hem and the fold-over waistband (which I did not finish with a seam, simply folded it and left the edge raw.
Voila!

Subscribe to:
Posts (Atom)